

If you’re facing Achilles surgery, the road ahead probably feels a bit daunting. The good news is that the recovery process is a well-mapped journey, not a sprint into the unknown. You can generally expect the achilles tendon surgery recovery timeline to span anywhere from six to twelve months, though a full return to your pre-injury athletic peak might take a little longer.
The whole process starts with a strict non-weight-bearing phase to protect the repair, then gradually moves into controlled motion, strength building, and finally, getting back to high-impact activities.
Understanding the Stages of Your Recovery
Think of your recovery as a marathon, not a race. It’s a carefully planned progression with clear signposts telling you what’s coming next and when you’re ready to advance.
An Achilles tendon repair is a lot like meticulously gluing a frayed rope back together. Right after surgery, that bond is incredibly fragile. It needs total protection from any pulling or weight. As the “glue” starts to cure and the tendon fibers heal, you can slowly begin to test the repair with gentle movements. Eventually, as it strengthens, you can trust it to handle the full load of daily life and, ultimately, sports.
This structured timeline is critical. It ensures you’re applying just the right amount of stress at the right time to encourage strong, organized healing without risking a devastating setback.
Key Phases of Healing
Your journey will follow a few distinct stages, each with its own specific goals and limitations. Working closely with a skilled surgeon and a dedicated physical therapist is non-negotiable for navigating this process safely and effectively. If you’re looking for top-tier specialists to guide you, you can find a doctor through dedicated medical networks that connect patients with elite physicians.
The infographic below breaks down the three primary phases you’ll move through.
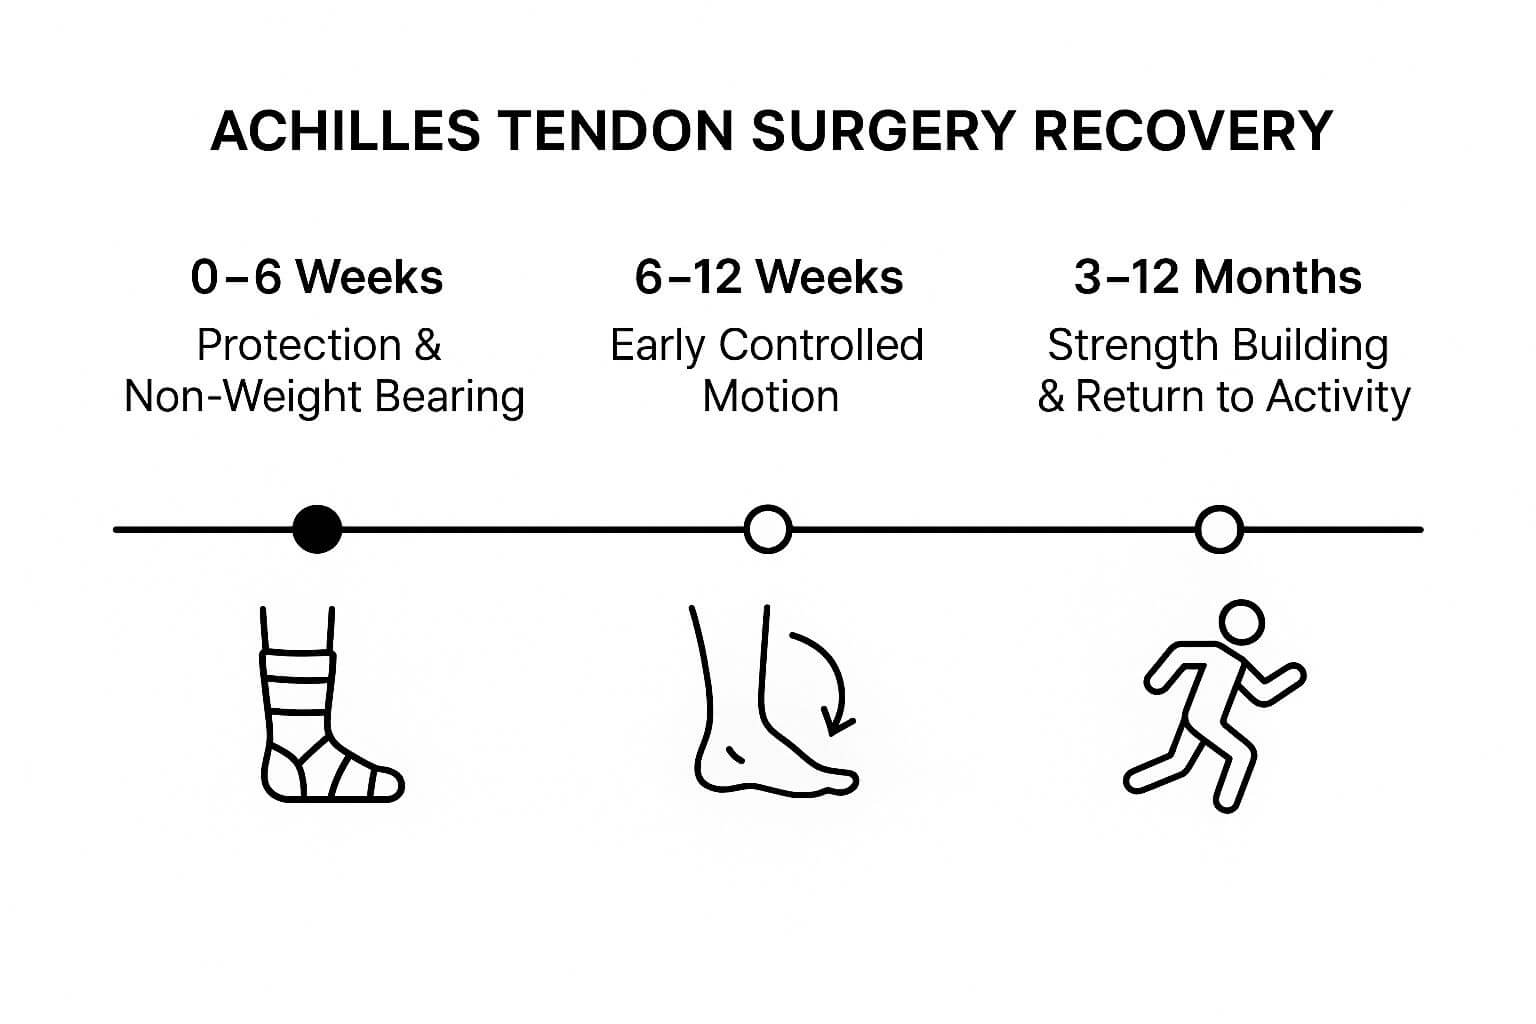
As you can see, the process shifts dramatically from passive protection in the beginning to active, intensive rehabilitation. That final phase is the longest for a reason—it’s all about methodically rebuilding the strength and resilience needed to get you back to 100%.
Achilles Recovery Timeline At a Glance
To give you a clearer picture of the road ahead, here’s a high-level summary of what to expect at each stage of your recovery.
| Recovery Phase | Typical Timeframe | Key Milestones and Activities |
|---|---|---|
| Phase 1: Protection & Healing | Weeks 0-6 | Non-weight-bearing in a cast or boot. Focus on elevation, ice, and pain management. The tendon is extremely fragile. |
| Phase 2: Early Mobilization | Weeks 6-12 | Transition to a walking boot with wedges. Begin partial weight-bearing. Gentle range-of-motion exercises with a physical therapist. |
| Phase 3: Strengthening | Months 3-6 | Wean off the boot and into supportive shoes. Focus on progressive strengthening, balance, and proprioception exercises. Low-impact cardio like stationary biking. |
| Phase 4: Return to Activity | Months 6-12+ | Begin jogging, jumping, and sport-specific drills. Focus is on regaining power, explosiveness, and confidence in the tendon. |
Remember, this table is a general guide. Your surgeon and physical therapist will tailor the specifics to your individual surgery, progress, and long-term goals. Sticking to their plan is the surest way to a successful outcome.
The First Six Weeks: Protecting the Repair
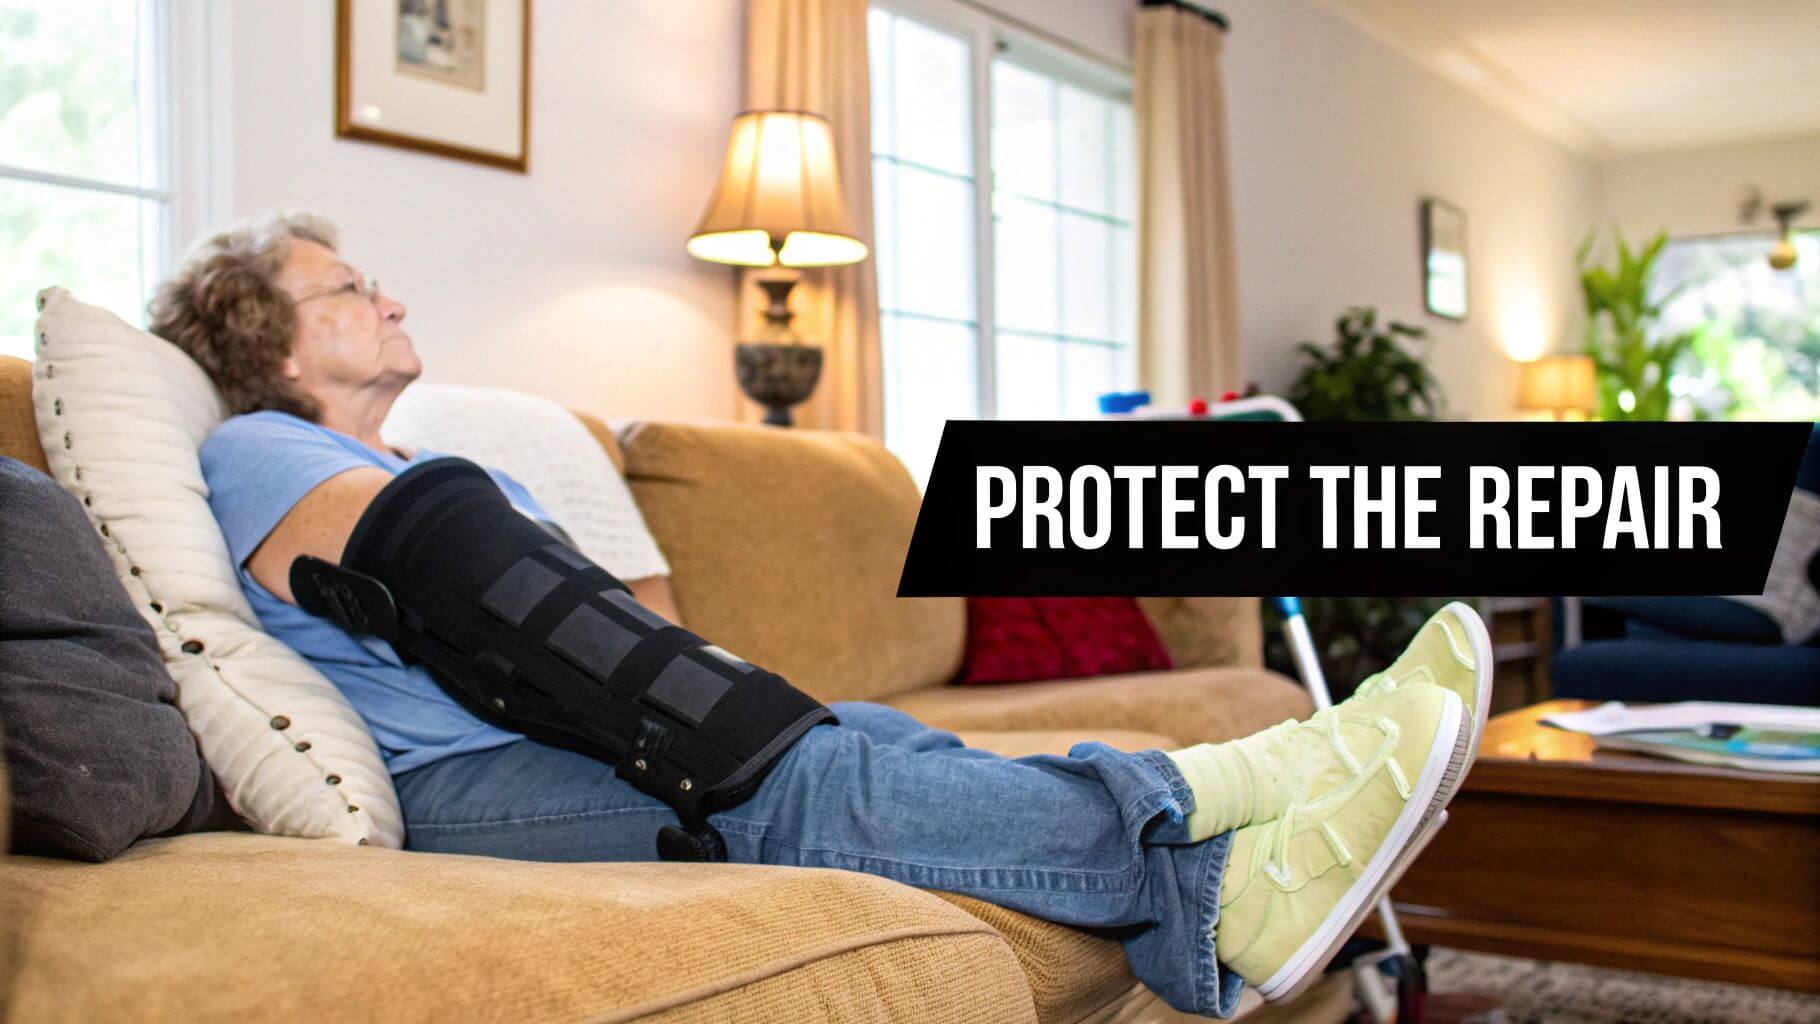
The initial six weeks after your Achilles tendon surgery are all about one thing: protecting the delicate repair work. I tell my patients to think of the newly sutured tendon like fragile silk threads; any premature stress can make the whole thing unravel. This phase isn’t about active rehab. It’s about creating the perfect, undisturbed environment for healing to kick into gear.
Your only jobs are to manage pain, crush the swelling, and keep every ounce of weight off that foot. You’ll be immobilized in a splint or cast, positioned to keep the tendon slack and totally free of tension. This protective shell is your tendon’s bodyguard, and following your surgeon’s instructions to the letter is non-negotiable.
Weeks 0 to 2: The Immobilization Period
Right after surgery, you are strictly non-weight-bearing. That means getting friendly with crutches or a knee scooter. The first 48-72 hours are usually the toughest, as pain and swelling hit their peak. Stay ahead of the discomfort with your prescribed medication—don’t try to be a hero.
Your most powerful tool during this time? Gravity.
Keep your foot elevated above the level of your heart as much as you possibly can. This one simple action is the single most effective way to drain swelling. Less swelling means less pain and a better healing environment for the tendon.
Daily life is going to require some creative adjustments. Showering with a cast bag and setting up a “command center” on your couch will make this period a whole lot more manageable. Your mission is simple: rest, elevate, and let your body’s healing machinery do its work.
Weeks 3 to 6: Beginning the Transition
Sometime around the two- or three-week mark, you’ll likely trade the hard cast for a removable walking boot. This boot, often fitted with heel wedges, continues to shield the tendon but gives you a bit more freedom—like finally showering without wrestling a plastic bag.
This is a pivotal moment in the achilles tendon surgery recovery timeline. Most protocols call for a non-weight-bearing period of about three to four weeks to protect the repair site. As you head into weeks four through six, your surgeon may give you the green light for progressive mobilization, but the key is to avoid any over-stretching of that healing tissue. To see how this fits into the bigger picture, you can explore more about the standard post-operative care and rehabilitation for Achilles repair.
You might get cleared for “toe-touch” or partial weight-bearing during this stage, but only when your surgeon says so. Physical therapy often starts here with incredibly gentle, passive range-of-motion exercises. The goal is just to prevent stiffness without putting any real load on the repair. This phase demands patience. The tendon is still incredibly vulnerable, and sticking to your restrictions is everything.
Weeks 6 to 12: Shifting to Active Rehabilitation
The period between weeks six and twelve marks a massive turning point in your Achilles recovery. This is where you finally get to pivot from a passive, protective mindset to taking an active role in your own comeback.
Think of the first six weeks as letting the concrete foundation of a house cure. It was all about rest and protection. Now, you’re finally ready to start carefully building the frame.
This phase is almost always synonymous with the start of formal physical therapy. Your therapist becomes your coach, your guide, and your most important ally. They’ll navigate you through the delicate process of reintroducing movement and load to the healing tendon. It’s a partnership—you need to trust them and communicate constantly to make sure you’re progressing without pushing too hard, too soon.
The primary goal is no longer just protection. It’s about a gradual, deliberate restoration of function. This is where you begin to reclaim your ankle.
Your First Steps in Physical Therapy
Around the six-week mark, most surgeons will give you the green light to transition from non-weight-bearing to partial weight-bearing while still in your protective boot. Eventually, you’ll progress to putting your full weight on it. Your physical therapist’s first job is to teach you how to walk correctly again, fixing any weird limps or compensatory habits you picked up while on crutches.
Early therapy sessions are all about very specific, gentle objectives:
- Restoring Range of Motion: Your therapist will use hands-on techniques and teach you simple exercises to gently coax your ankle out of its stiffness. The focus is on improving dorsiflexion (pulling your foot up) and plantar flexion (pointing your foot down) without putting any real stress on the surgical repair.
- Waking Up the Muscles: After weeks of doing nothing, the muscles in your calf and lower leg have basically gone dormant. Your first exercises will be simple, controlled contractions designed to re-establish that crucial connection between your brain and those muscles.
- Managing Scar Tissue: Gentle massage around the incision area is key. This helps break up scar tissue, which is critical for improving how the tendon glides and for boosting your overall flexibility.
A huge milestone during this phase is finally weaning out of the walking boot. This doesn’t happen overnight. It’s a gradual process that usually starts indoors around the eight-week mark and progresses week by week until you’re comfortably walking in supportive shoes by week twelve.
Building a Foundation for Strength
Don’t expect to be doing any heavy lifting just yet. But the exercises you do in this phase are absolutely critical for what’s to come. They lay the essential groundwork for the more intensive strengthening that starts after the three-month mark.
You’ll likely be doing a lot of seated resistance band exercises, gentle calf isometrics, and basic balance training. Each movement is carefully chosen to stimulate healing and build endurance in the tendon fibers without overwhelming them.
By the time you hit the end of week twelve, you will likely have ditched the boot for good, gained a significant amount of mobility back, and started to feel like you’re truly on the path back to normal. This methodical, step-by-step progression is the secret to a successful long-term recovery.
Months 3 to 6: Rebuilding Strength and Function
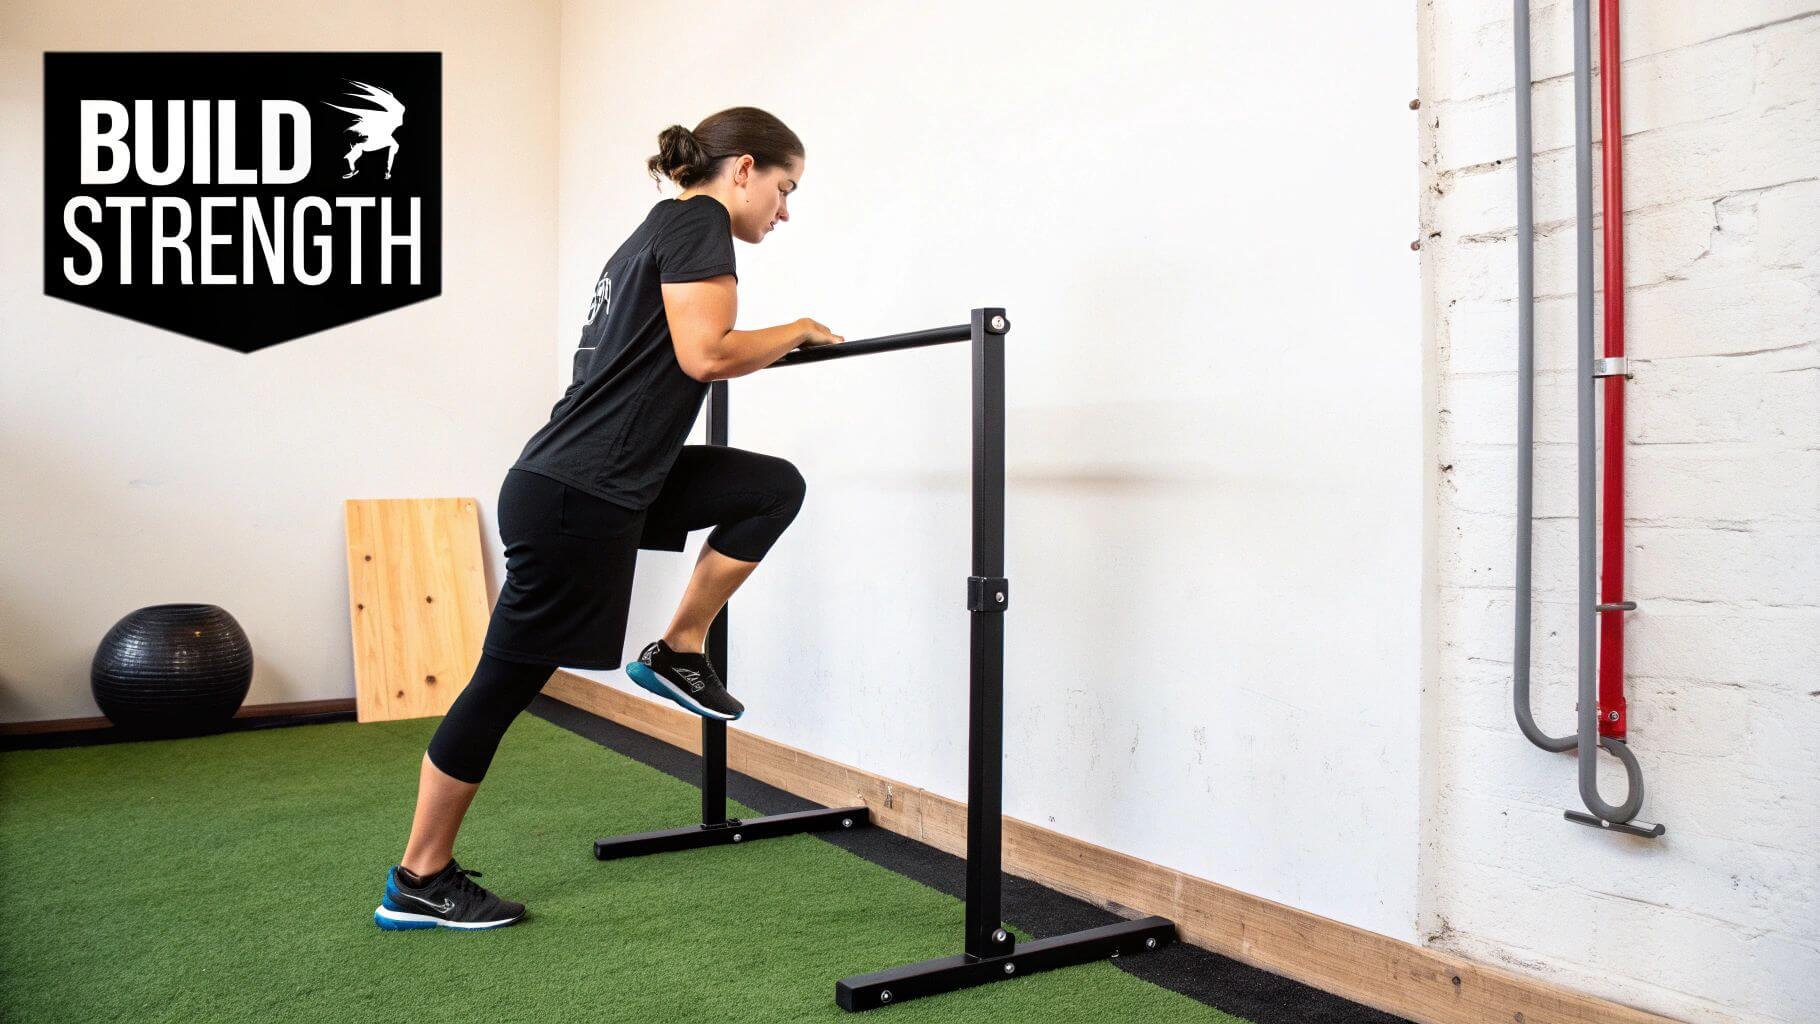
This three-month block is where the real work begins—and where you start to see all your patience pay off. The focus shifts dramatically from simply healing to actively rebuilding functional power. Think of it this way: the first couple of months were about letting the foundation cure. Now, it’s time to start building the house.
The main enemy we’re fighting here is calf muscle atrophy. After weeks of immobilization, your calf muscle has shrunk significantly, and that’s completely normal. Your physical therapy sessions will intensify, introducing more demanding exercises designed to build real-world strength and endurance. This is a pivotal stage in your achilles tendon surgery recovery timeline that sets you up for returning to the activities you love.
Building Foundational Strength
Your therapist is going to start loading the tendon in a controlled, progressive way. We’re moving beyond gentle range-of-motion work and into systematically strengthening the entire chain of muscles from your foot all the way up to your hip.
You can expect your routine to start including exercises like these:
- Stationary Cycling: This is usually one of the first cardio activities to get the green light. It’s a fantastic low-impact way to get blood flowing, rebuild some endurance, and keep the ankle joint moving without the high-impact stress of running.
- Heel Raises (Seated and Standing): This is the bread and butter of Achilles rehab. You’ll start with two-footed raises, probably holding on for support, and slowly, painstakingly work your way toward single-leg raises. This directly targets the calf and tells the healing tendon it’s time to get stronger.
- Resistance Band Exercises: The bands will come out for more advanced exercises that strengthen the calf and surrounding ankle muscles from all angles, which is critical for improving stability.
Nothing about this is rushed. You won’t be jumping into hundreds of reps. Your physical therapist will meticulously guide you, adding a few more reps or a slightly stronger band only when your body shows it’s ready. The goal is to encourage the tendon to adapt, not to overload and anger it.
A huge focus now is regaining symmetry. We want the surgically repaired leg to be just as strong as your uninjured one. This is non-negotiable for a good long-term outcome. Studies show that strength deficits of 10% to 30% can linger even a year after surgery, which is exactly why this strengthening phase is so vital.
Retraining Your Body’s Internal GPS
Strength is only half the battle. This period is also about rebooting your proprioception. Think of proprioception as your body’s internal GPS—it’s the silent sense that tells your brain where your foot is in space without you having to look. After an injury, surgery, and immobilization, this system is seriously offline.
Getting it back is essential for preventing a clumsy stumble or even a devastating re-injury down the road. The primary tool here is balance work. You’ll start simple, maybe just trying to stand on one leg on the floor. From there, you’ll progress to more challenging surfaces, like a foam pad or a wobbly balance board.
These drills aren’t just about not falling over. They are actively retraining the neural pathways between your ankle and your brain, sharpening your reflexes so you can handle uneven ground or a sudden misstep. This is how you build a comeback that is not just strong, but truly stable.
Months 6 to 12: Returning to High-Impact Activities

This is the phase you’ve been working toward for half a year—the final leg of the marathon. The months between six and twelve mark the carefully managed transition from functional strength to dynamic, high-impact performance. The goal is no longer just to walk without a limp; it’s to run, jump, and pivot with confidence.
But this isn’t a finish line you simply cross. Think of this stage as advanced rehabilitation where your repaired tendon is stress-tested like an engineer testing a bridge before allowing traffic. Every component has to be proven strong enough to handle the sudden, explosive forces of sports and intense activity.
The Green Light Criteria
Before your surgeon or physical therapist will even consider clearing you for running, they’ll evaluate you against a strict set of objective criteria. Passing these tests is non-negotiable. They are the best indicators that your tendon is ready for the next level of stress.
Consider it a final exam for your recovery. Your care team will be looking for specific benchmarks:
- Symmetrical Strength: You must prove that your calf strength on the surgical side is at least 85-90% of your uninjured side. This is usually measured through single-leg heel raise tests that assess both endurance and power.
- Full Range of Motion: Your ankle’s flexibility, especially dorsiflexion (pulling your toes toward your shin), needs to be nearly identical to your other ankle. Any limitation can throw off your mechanics and set you up for other injuries.
- Excellent Balance: You’ll need to show exceptional single-leg balance and control. This proves that your body’s internal GPS—its proprioception—is fully back online.
- Pain-Free Function: All your strengthening exercises, including hopping and basic jumping drills, must be done without pain or significant swelling afterward.
Only when you’ve ticked all these boxes does the conversation about returning to sport begin. This structured approach is a critical part of the achilles tendon surgery recovery timeline, designed to prevent a devastating re-injury.
Advanced Strengthening and Sport-Specific Drills
Once you’re cleared, your physical therapy shifts gears dramatically. The focus moves to rebuilding the “springiness” and reactive strength of the Achilles tendon. This is where you re-learn how to be an athlete.
Your program will now incorporate advanced drills like:
- Plyometrics: This is essentially jump training. You’ll start with simple two-footed hops and slowly progress to box jumps, single-leg hopping, and bounding. These exercises are crucial for retraining the tendon to absorb and release energy efficiently.
- Agility Work: Expect drills using ladders, cones, and boxes. These help you practice changing direction, accelerating, and decelerating—movements that are fundamental to most sports.
- Sport-Specific Movements: If you’re a basketball player, you’ll start practicing cutting and defensive slides. A soccer player will begin dribbling and passing drills. The goal here is to reintroduce the exact movements your sport demands, but in a controlled environment.
It’s essential to manage expectations during this period. A “return to sport” is a gradual process. You won’t go from the clinic to playing a full game overnight. It’s a slow build-up of intensity and duration over many weeks or even months.
Managing Expectations for Your Return
While the physical work is demanding, the mental game is just as important. It’s natural to feel a mix of excitement and apprehension. Learning to trust your repaired tendon again simply takes time.
Research provides a realistic picture. One study following patients after surgery found that the average time to resume sports was 7.7 months, though the range was wide. The good news? 89.6% of patients did get back to sports, and over half of them performed at the same or even a higher level than before their injury. You can explore the full clinical outcomes and return-to-sport rates for more details.
This data really underscores the importance of patience. Your journey is unique, and getting back to your pre-injury performance level is a testament to consistent, hard work.
Navigating Recovery Beyond the First Year
Crossing the one-year mark after Achilles surgery is a massive milestone. It’s a huge achievement, but it doesn’t mean the journey is over. While you’ve probably returned to most, if not all, of the activities you love, the reality is that long-term healing and optimization is an ongoing process. This next phase is all about fine-tuning, listening to your body, and understanding the subtle differences that might linger.
Think of that first year as building a brand-new road. The second year and beyond is about maintaining it—patching the small cracks before they become potholes and making sure it can handle whatever traffic you throw at it for years to come. Your repaired tendon is strong, but it may always feel just a little different than the uninjured one.
Understanding Long-Term Deficits
It’s completely normal for patients to notice subtle, persistent deficits even after a fantastic recovery. This isn’t a sign of failure; it’s just a well-documented part of this specific injury. Most commonly, these lingering issues show up as minor differences in strength and endurance.
For instance, you might feel that your surgically repaired leg gets tired a bit faster on a long run, or that your calf doesn’t have the same explosive “pop” when you jump. Research shows these long-term functional deficits are common, with plantar flexion strength sometimes remaining 10% to 30% lower than the unaffected side even a full year post-op. Heel-rise endurance, a key measure of calf muscle function, can also stay 20% to 30% below normal. You can dive deeper into the data behind long-term Achilles rehabilitation outcomes to understand the numbers.
These statistics really drive home why ongoing conditioning is so critical for long-term success.
Strategies for Continued Improvement
Optimizing your function from here on out is a continuous journey, not a race to a finish line. The real key is to weave maintenance work into your regular fitness routine, allowing you to manage your ankle’s health for decades.
- Consistency Over Intensity: Whatever you do, don’t stop doing your heel raises. Simply incorporating 2-3 sets of single-leg calf raises a few times a week is a powerful, low-effort way to maintain that hard-earned strength.
- Listen to Your Body: A little stiffness or soreness is normal, especially after trying a new or particularly intense activity. The goal is to learn the difference between productive muscle soreness and the kind of pain that signals you’ve pushed too far, too fast.
- Embrace Cross-Training: Activities like swimming and cycling are fantastic for maintaining cardiovascular fitness and leg strength without the repetitive, high-impact stress of running.
Ultimately, long-term success is all about smart management. For more complex cases or for individuals with underlying conditions affecting connective tissues, consulting with specialists is a must. You can find information and connect with the top Ehlers-Danlos doctors and clinics who bring deep expertise in these areas. Your recovery is a testament to your hard work, and continuing to care for your ankle ensures you can enjoy the results for a lifetime.
Common Questions About Achilles Recovery
Going through the Achilles tendon surgery recovery timeline naturally brings up a lot of practical, day-to-day questions. Having straight answers can quiet the anxiety and let you focus on what really matters: healing.
Let’s tackle some of the most common concerns patients have on this journey. Getting a handle on these issues will give you a much more realistic picture of the road ahead, helping you set the right expectations from the very beginning.
How Long Will Pain and Swelling Last?
Let’s be direct: the first 1-2 weeks after surgery are when pain and swelling are at their peak. This is the acute phase, and it’s managed with the medication your surgeon prescribes and, just as importantly, keeping your foot elevated above your heart as much as possible.
While that sharp, initial pain fades fairly quickly, don’t be surprised if you’re dealing with residual swelling and general discomfort for 3 to 6 months. This is completely normal, especially after you start moving more or after a tough physical therapy session. Your best friends for managing this long-term are sticking to that elevation routine and using ice strategically.
When Can I Expect to Walk Normally Again?
Most people shed the protective boot and start walking on their own two feet around the 6 to 8-week mark. But walking normally? That’s a different milestone altogether. It’s almost universal to have a noticeable limp at first. This happens for a few reasons: your calf muscle is weak, your ankle is stiff, and your brain is literally re-learning how to execute a smooth, natural gait.
With consistent, dedicated physical therapy, most patients get back to a pretty normal walking pattern for daily life by about 4 to 6 months. But getting rid of that last, subtle limp, especially when you’re walking fast or trying to jog? That can take closer to a full year as your strength, coordination, and confidence fully return.
What Is the Risk of Rerupturing the Tendon?
The fear of re-injuring the tendon is real, and it’s a thought that crosses nearly every patient’s mind. The good news is that the actual risk of rerupturing the tendon after a surgical repair is quite low. Solid research puts the rate somewhere between 2-5%.
The highest-risk window is during the first three months of recovery. This is when the tendon is still knitting itself back together and simply isn’t ready for sudden movements or heavy loads. This is precisely why listening to your surgeon about weight-bearing limits and being diligent with your physical therapy protocol is non-negotiable for a good outcome.
Will My Ankle Ever Feel Completely Normal Again?
The goal of both the surgery and the rehab is to get you back to full, unrestricted function. And for over 90% of patients, that’s exactly what happens—they get back to all their desired activities. That said, it’s very common for people to report that the repaired ankle just feels a little… different, even years down the road. For anyone determined to get the best possible outcome, it’s worth looking into top-tier specialists; you can learn more about finding the best orthopaedic surgeons in the field to oversee your recovery.
You might notice slight differences in flexibility, get some occasional stiffness after a long day, or just feel a different sensation in the tendon itself. For the vast majority of people, these subtle changes are just reminders of the journey and don’t limit their ability to live an active life. The best way to minimize these long-term differences is to stay consistent with stretching and ongoing strengthening exercises to maintain peak function.
At Haute MD, we connect you with the nation’s leading medical experts who are rigorously vetted for their exceptional skill and patient outcomes. Find a top-tier physician to guide your recovery journey by exploring our network at https://www.hauteliving.com/hautemd.